I am making this gorgeous springtime vest for my boys for Easter. Ambitious, I know, as there are 3 of them and one of me and less than 3 weeks till Easter. o.O I really enjoy the pattern. What do I mean by enjoy? It's easy to read, very clear, and VERY FEW ends to weave in after the project is done. The body is done in the round without turning and since it's single crocheted, I went with a spiral instead of the typical, join w/ sl st, ch 1, sc, etc, it's easier and seamless and I'm lazy.
When I got to the back part, the instructions are to go to rows, I did one row this way and I was annoyed that the pretty fabric I made was now going to be ruined halfway up because of the silly turns necessary to working in the row... then I remembered a video I had watched about tapestry crochet, AHA!
General instructions are (at the end of the row) ch 1, turn, hold working yarn toward your body, not away from you, insert hook from back to front (inserting your hook through the right side of the fabric to the wrong side) yarn over turning your hook to catch the yarn and pull up a loop, then yarn over and pull through to complete the stitch. <----- a lot easier to watch the video!!
Tapestry crochet is now my new best friend for making fabrics, because although the stitches slant left or right on alternating rows there is no more of the flubbed up look like in here.

Notes for this pattern: for the gauge, I needed to go down two hook sizes for the Bernat Softee Baby yarn I am using. I am making the smallest size and will probably best fit 12-24 mos NOT 2-4 yrs specified in the pattern. I will likely go up to the hook size recommended for the pattern (not to obtain the gauge) to get the size I need for my 3 yr old.

The variance in the fabric you see is my solution to getting bored with SC so I did one row of sc, dc around; one row of dc around; one row of sc, dc around about 3/4 of the way up.
UPDATE 3/18/13:
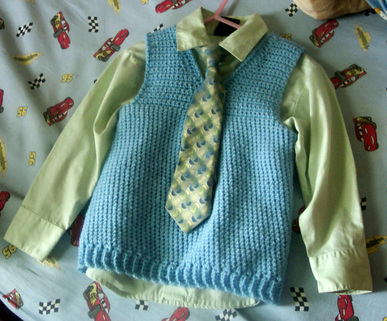
It's finished, I'm pretty happy with the final results.
A couple of notes: The ribbing used in the pattern is NOT the typical ribbing I've seen taught by most videos or pattern instructions and I really love it because it is super stretching like a knitted ribbing in all the right places - so USE IT ;)
I did a narrow ribbing on the v-neck the same version used on the bottom and then did a row of dc around the arms to get a nice finished look.
The sc make a pretty rigid fabric with very little give so I think future products made from this pattern will be using the sc, dc repeat to allow a bit more give and texture.
Final note: When meeting the gauge the yield for this pattern definitely gave me a narrow 12-18 mos size, so I would encourage you to find the gauge and then go UP a hook size or two to get the size you need. Please note that this is also dependent on yarn used so plan accordingly.


You can see that the reverse stitch or tapestry stitch used here gives a smoother fabric transition.
No comments:
Post a Comment